- Home
- Electrically Conductive
- Fast Window Defroster & Grid Line Repair Kit Quick 2 hour RT Cure time
- Home
- Electrically Conductive
- Silver
- Fast Window Defroster & Grid Line Repair Kit Quick 2 hour RT Cure time
- Home
- Electrically Conductive
- Silver
- 2 Component
- Fast Window Defroster & Grid Line Repair Kit Quick 2 hour RT Cure time
- Home
- Electrically Conductive
- Silver
- Room Temperature Cure
- Fast Window Defroster & Grid Line Repair Kit Quick 2 hour RT Cure time
- Home
- Electrically Conductive
- Silver
- Heat Cure
- Fast Window Defroster & Grid Line Repair Kit Quick 2 hour RT Cure time
- Home
- Product Properties
- Fast Window Defroster & Grid Line Repair Kit Quick 2 hour RT Cure time
- Home
- Product Properties
- EMI/RFI Shielding
- Fast Window Defroster & Grid Line Repair Kit Quick 2 hour RT Cure time
- Home
- Product Properties
- Electronics Industry
- Fast Window Defroster & Grid Line Repair Kit Quick 2 hour RT Cure time
- Home
- Product Properties
- Heat Resistant
- Fast Window Defroster & Grid Line Repair Kit Quick 2 hour RT Cure time
- Home
- Product Properties
- No Sag
- Fast Window Defroster & Grid Line Repair Kit Quick 2 hour RT Cure time
- Home
- Thermally Conductive
- Fast Window Defroster & Grid Line Repair Kit Quick 2 hour RT Cure time
- Home
- Thermally Conductive
- Epoxy
- Fast Window Defroster & Grid Line Repair Kit Quick 2 hour RT Cure time
- Home
- Product Properties
- Specific Applications
- Fast Window Defroster & Grid Line Repair Kit Quick 2 hour RT Cure time
- Home
- Thermally Conductive
- Silver Epoxy
- Fast Window Defroster & Grid Line Repair Kit Quick 2 hour RT Cure time
Fast Window Defroster & Grid Line Repair Kit Quick 2 hour RT Cure time
Product Description
Fast Window Defroster and Grid Line Repair Kit Quick 2 hour RT Cure time Quick 2 hour RT Cure time
How To Repair Your Window Defroster Grid With ConductiveX's Defogger Repair Kit

Window Defroster Grid Repair Kit
The Window Defroster Grid Repair kit is an epoxy adhesive and coating formulation based on pure silver. This versatile silver formulation offers the maximum continuity of conductivity with an electrical resistivity value of less than 1x10⁻⁴ ohm.cm.
Our Defroster/Window Grid Repair kit is also characterized by a wide operating temperature range from –50 to +170°C.
This Defroster/Window Grid Repair kit is recommended for grid repair, electronic bonding, or sealing applications that require both fine electrical and mechanical properties. It can Substrates also aluminum, copper, magnesium, steel, bronze, nickel, kovar, ceramic, glass, phenolic and G-10 epoxy glass boards.
How To Repair Window Defogger Strip
Put the measuring lead (Red) and the reference (Black) of the Multimeter on the damaged grid line at both ends, right where the grid connects with the wide bus bars. Move one probe--it doesn't matter which--to the center of the line. If you now read 6 volts, the scratch is not in between the two probes. If you read the same system voltage, 12 volts or so, the break is in between the old probe location and the new one. Just move the probes until you find the location that has full system voltage spanning it. Now it's time to turn off the de¬froster grid and the ignition switch.
How To Repair The Defroster Tabs
- Clean the tab and the contact area with the alcohol prep. Then apply activator to both surfaces and let it dry.
- Apply the completely mixed adhesive kit to the prepared surfaces, and gently press these surfaces together. Contact pressure is adequate for strong, reliable bonds; however, maintain contact until adhesive is completely cured.
- Press the tab onto the contact area. Hold it in place until the adhesive sets up, usually about two minutes. Wait 24 hours to use the defogger.
Defroster Tabs
The tabs located along the sides of the defroster connect the defroster electrically to the vehicles defrost circuit. One tab is the positive and the other ground. If a tab comes off the defroster this will mean total instantaneous failure of the defroster.
- Our kit is an epoxy adhesive. To use, carefully clean and dry all surfaces to be bonded from all dirt, dust, debris and handprints from the rear window.
- Apply the completely mixed adhesive kit to the prepared surfaces, and gently press these surfaces together. Contact pressure is adequate for strong, reliable bonds; however, maintain contact until adhesive is completely cured.
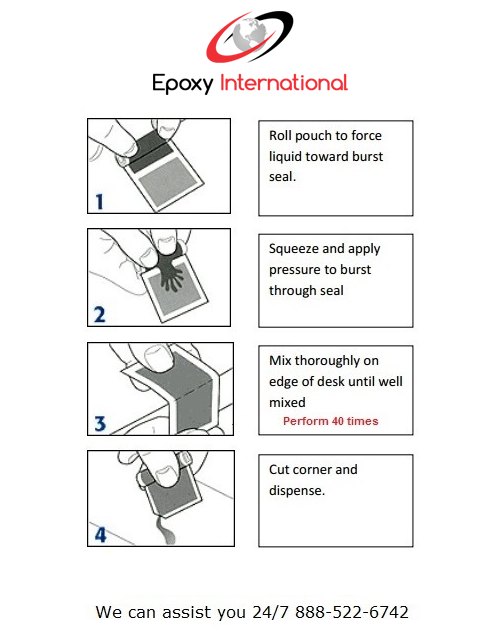
- Some separation of components is common during shipping and storage. For this reason, it is recommended that the contents of the shipping container be thoroughly mixed prior to use.
- Some ingredients in this formulation provided may crystallize when subjected to low temperature storage. A gentle warming cycle of 52°C for 30 minutes prior to mixing components may be necessary. Crystallized epoxy components do not react as well as liquid components and should be re-dissolved prior to use for best results.
 Loading... Please wait...


